 |
| This is "Fr. Needs-A-Face". I created a paper doll priest and felt vestments for the lesson on liturgical colors. |
Yet, with time and God's grace, we are doing it! Our Atrium is transported, set up, and broken down every week. Most of these materials make the rounds with me all over town in the back of my van .
The greatest challenge with this approach is finding a way to remain true to the ideals of CGS, while still creating beautiful, sturdy materials that take up very little space.
This page is the story of how I do it.
Prayer Table
 Central to the CGS environment, the prayer table is one of the first works students encounter. Finding a table of the right size and height for an Atrium is important. It should be simple, sturdy, and a good fit for small children to use. For a mobile environment, the prayer "table" should also be functional, which for our Atrium, meant it need not be a table at all. Our first year, we used a square storage cube that allowed me to store and transport other materials. This was not a perfect setup, but met our needs.
This is our prayer prayer table, which I bought for $10 at Walmart. The legs screw on easily without any tools, and can be removed for summer storage. It is lightweight and easy to transport. It held up well bouncing around in the back of our van for the past year.
The students love adding flowers to the prayer table almost as much as they enjoy snuffing out the candles after our Scripture reading and prayer time. The vases used came from the Dollar Tree. The kids love them for flower arranging activities. We reuse silk flowers purchased and donated from various places I store them in a decorative box from Michael's.
The table cloths were made last summer, one in green, red, purple and white. I measured the table dimensions and added extra inches for its height and an inch for the hem. This was one of my first sewing projects, so if I can do this, I'm sure ANYONE can.

We do use a real candle for our prayer table. After a small "incident" with another candle in our sanctuary lamp (the glass burst from the heat), we switched to LED candles for the altar and other areas of the atrium. Of course, we only use the real candles with adult supervision.
Our prayer cards are hand-made, then laminated. We use a plate stand from K-mart to hold the prayer cards.
The statue of the Good Shepherd was the biggest challenge. The first year we began the Atrium, I was unable to find an affordable figure. After hours at Peddlers Mall, I found an image of Jesus with several lambs that we used the first year. The statue in this image came from Autom, which sells the statues for about $10. This was by far the best price I found in my search.
The kids didn't initially gravitate toward the prayer table. It was much later in the year before they began to use it more often. Each group of children, and each child, is unique. Some want to spend long periods of time in prayer, while others are drawn more to the hands-on works instead.
 |
| This is the Cenacle work. While this may be purchased for a fair price by online sellers who craft them, I made this one myself, using materials I purchased at Michael's. It cost about $30 in material and took about 10 hours to create. |
Above is our cenacle, which I recently created using materials from Michael's craft store. The base of the room is a frame for a hanging shadow box, with the metal hangers on the back removed. The sides are small (4X4) wood squares, and on each side I used two larger wood squares. The center shape was also available at Michael's, and was the inspiration for this do-it-myself attempt. After I saw it, I began looking for the other pieces and was thrilled to see that they would actually all fit in the space of the tray. Only one small cut was needed to make room for the space used by the hot glue. If you are not feeling up to the crafting challenge, there are several great online resources for purchasing these pieces. Just do a quick google search or see what others are using on Pinterest.
Once the cenacle was glued together, I painted with craft paint and covered it with Mod Podge. The stone floor was also painted, and took quite a bit of time, but was really fun to do. The table/altar is a piece of rectangular wood from the craft store, with four wooden spools (as are used for thread), hot glued on as legs. I didn't paint it, as it is covered with the cloth. I measured, cut and sewed the little altar cloth in about 3 minutes from scrap white cloth left over from other pieces.
The chalice, crucifix and paten were formed from Sculpey, and the candlesticks/candles and flower vase were purchased at a nearby dollhouse museum. Since the small candles were plastic and could not be lighted and used safely with small children, I use LED candles instead. The kids love having the chance to light them as part of the presentation. Jesus and the disciples are peg dolls purchased in bulk from Amazon. I found tips on painting these from several sites on Pinterest.
 The Altar
The Altar work is by far one of the most popular works in our Atrium. Our first year, most of the pieces were borrowed. Now, after a little effort and a lot of shopping around, I have pieced together an altar work that our children really enjoy.
The model altar is a small, black accent table I bought at TJ Maxx a few years back. It is just about two feet high, and rectangular in shape. The front is decorated with fleur de lys, as an added bonus!
I made the altar cloth last summer, measuring the width of the table and making sure the shape of it would hang down in front. I used two pieces back to back, and after sewing the two short sides and one long sides, I turned the cloth inside out and sewed across it with a simple straight stitch on my machine. Over this, I added some beautiful lace and secured it with a zigzag stitch. This decorative front made it easy to put together and beautiful, as well.
 The candle holders were purchased from the craft store, and are filled with white LED votive candles. The chalice and paten were purchased from Good Shepherd Resources. The crucifix was a gift we received. The "host" is a round wooden disc from the craft store.
  Our sanctuary lamp was purchased at the dollar store. It was ideal, but after using a real candle and placing it on a slightly uneven surface, it burst from the heat. So, if you can find one of these, be sure NOT to use a real candle inside it, but an LED one. I'm still looking for a new one!
The tabernacle was created using instructions from Lace at CatholicIcing.com. The ciborium came from the Shepherd's Closet at the National Association of the Catechesis of the Good Shepherd's website for about $3. I later found one a bit larger at Good Shepherd Resources for $10. The children decorated the space the flowers and vases using vases from the Dollar Tree and silk flowers.
 As the tabernacle sits on the tray of our whiteboard, we added a white cloth behind it to cover the tray and electrical outlet on the wall. The children love this work, and all of them gravitate toward it, even after using it for months.
 The Lecturn
I purchased this lectern from Ken Wood online. He makes some beautiful hand-crafted wooden works for Catechesis of the Good Shepherd. The lecturn is a bit too short for use with our model altar, but I found a $3 small wooden stepstool/table from a peddler's mall that I use for a base. Together, they are just the right height. The lectern comes unfished, so my daughter and I painted this one with brown craft paint.
As this lectern is small, the "lectionary" on top is is a Gideon Bible that belonged to my mother-in-law, and I sewed a cloth cover for it (with much trial and error). The cross on the cover is just two strips of golden ribbon sewn onto the fabric. The children love this and proclaim the Word of God frequently from this lectern.
Supplemental Materials
Much of Summer 2016 was, for me, spent crafting and sewing. But I also spent a good deal of time coloring and laminating supplemental materials for the various works. Below are several control charts and tracing packets for the CGS works. Each tracing card is 8 1/2 X 8 1/2 inches square, and fits within a 9 X 12 manila envelope, which has been laminated and trimmed to 9 X 9 inches, with an opening at the top to insert the cards. Within each envelope are the laminated tracing cards and scripture booklets. There also are several small folded booklets I downloaded from the National Association for CGS's website (www.cgsusa.org). All of these materials are available on their website. Those pictured below are only a small part of the whole, and some packets are yet to be created. Another option, recommended at the website, is to use folders for the tracing packets. I opted for the envelopes instead, as I had an abundance of them, and they take less space and can be transported and stored easily, without cards falling out.


The National Association's website also has information available for creating the supplemental collage for the Altar presentation. I created my own materials for this, using clipart from the Internet. A sample of the completed collage appears to the right. At the time I created the set, I did not have a membership to the National Association. In retrospect, I would prefer to use their set, and will likely do so in the fall, as the individual pieces are easier to cut out and the format allows more room for error in placement of the various items on the altar.
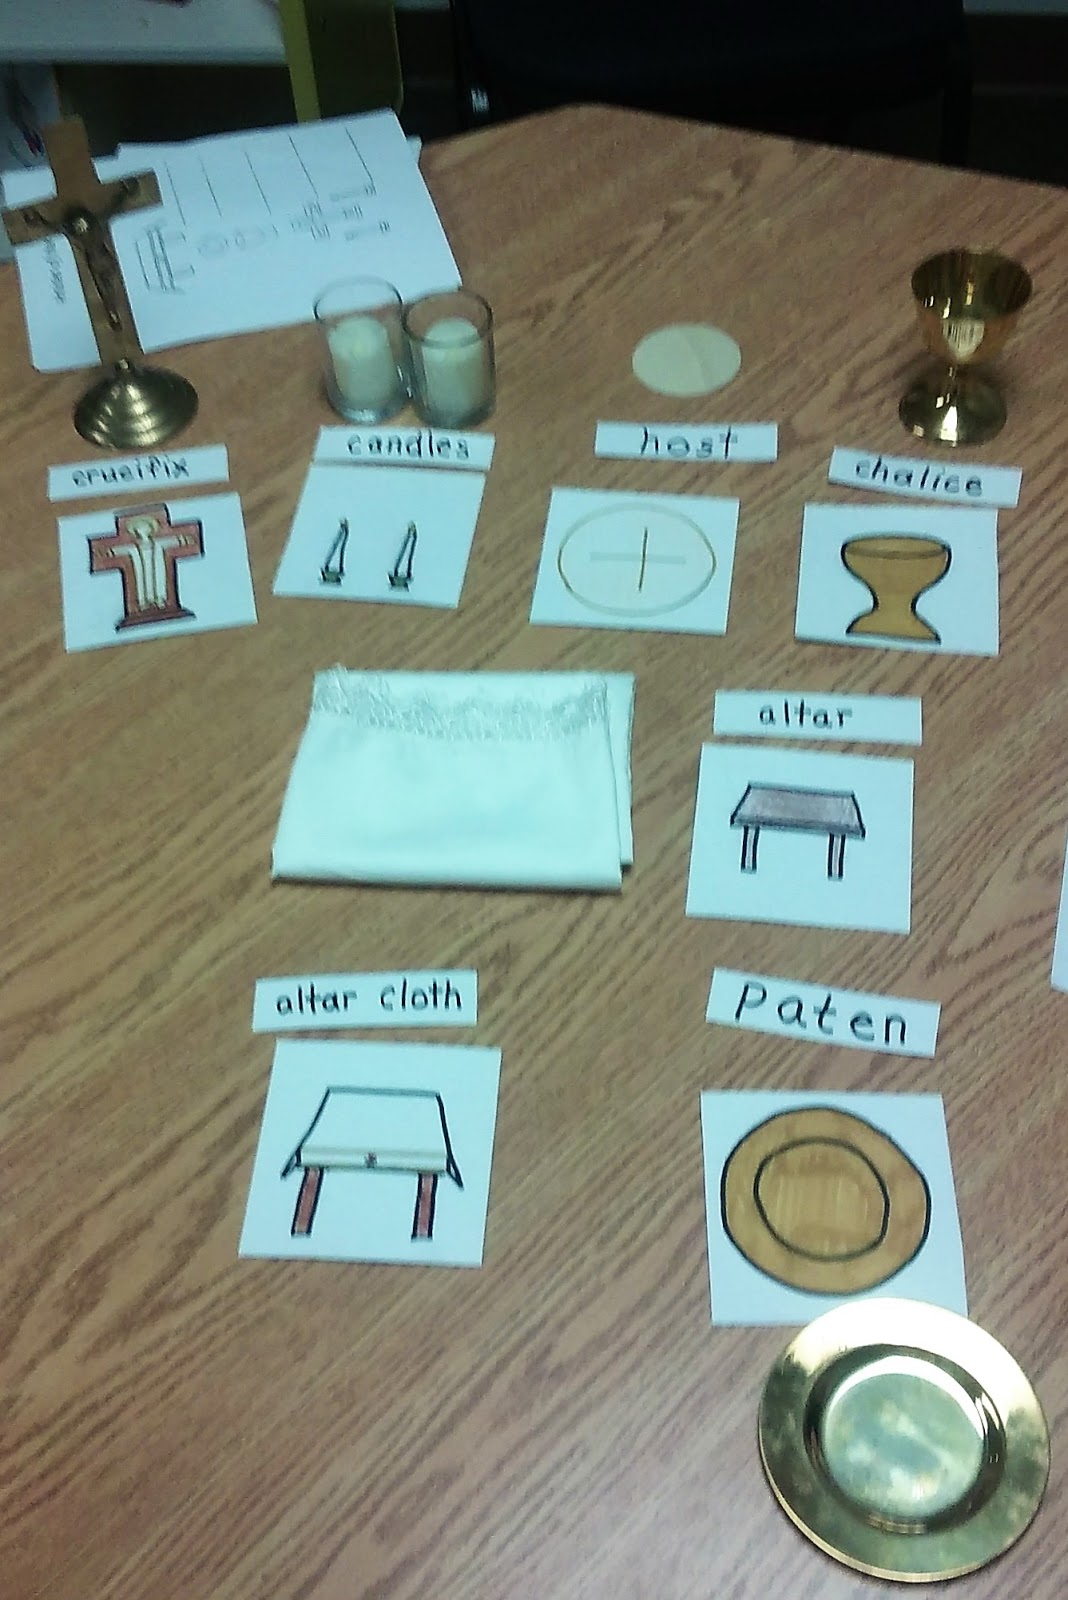
Below is another activity I created, allowing students to match images of the items on the altar with the written terms for each item. This was popular with the older students who were able to read, and the younger children matched the items to the image cards only.
The student in this picture is completing a handout with spaces to name items in a photo using the card set.
The Good Shepherd
 The central focus of the entire Atrium, the good Shepherd work is one that should be developed early in your efforts, even if you do not introduce it until later in the year.
 We ran the Atrium the first year without this work, and it was a challenge, as nearly every story the children encounter is intended to deepen their understanding of and relationship with Jesus, the Good Shepherd.
Without the work, I made use of images, prayer cards, and the statue on our prayer table to present the Good Shepherd visually in the minds of the children. The Good Shepherd appears in many forms (paintings, prayer cards, coloring sheets, statues, holy cards, etc.) throughout the Atrium.
 This work should be made of wood and painted. The pieces should be both beautiful and durable. Lacking the funds to purchase the wooden sets that are available, I used the images from the patterns on the National Center's website as my starting point. After coloring and laminating the images of the shepherd and the ten sheep, I mounted them to THICK, stiff cardboard and cut them out with an X-acto knife. Next, I attached the back of the images to each piece and glued them to small craft sticks. I had to draw the backs of the sheep in reverse and glue them on the backs, but this wasn't terribly difficult.
  Even after gluing the sheep to the craft sticks, they tended to fall over easily. After a month or two, I added thick round pieces of cardboard underneath, which made the sheep steady and easier for the children to use.
For the sheepfold, I took a small wooden fruit container and cut a small section out as a gate using a hacksaw. My husband added two tiny hinges, and then I painted the base and wood for a functioning sheepfold that was inexpensive but attractive and durable enough to last until I am able to replace it with a wooden set.
The children love this work, and it has gotten much use during our school year. I love watching the children move the pieces as the Shepherd leads his sheep into and out of the sheepfold. Their concentration is inspiring. And while this work is very engaging by itself, I make coloring sheets and a craft available for students who want to do this. For the craft, I print images of a sheep on a half sheet of paper (two to a page), and have the students color the face and hooves. Then I provide glue and cotton balls so that they can pull apart the cotton balls and glue then to the image for the soft "wool" on each sheep. This is a popular, but messy craft. Be sure there are enough volunteers to supervise this activity while allowing other students to do other works throughout the Atrium.

The work for the Liturgical Calendar was one that clearly needed to be purchased. I can't even draw a perfect circle, much less cut one from pieces of wood into 52 equally sized prisms.
The calendar I purchased was from Ken Wood's online shop. There is a backlog of a couple of months for projects, so bear this in mind when ordering. Mine came sooner than he predicted, and I was actually able to paint it in time to present according to the yearly schedule of presentations I made during the summer. I went ahead and ordered the storage box, so that the pieces would not be lost during transport.
The calendar was unfinished when it arrived. I began by painting the box, base, and lid with brown craft paint. Wood stain is also a beautiful option, though I couldn't bear the smell and had my daughter helping me paint. I used only one coat, and added clear gloss to the paint, so I ended up with a look very much like wood stain. I tested on the bottom of the box before I began.
 Next, I used the thin wooden letters available in a canister from the craft store. I painted each with gold craft paint. After these dried, I glued them to the lid with Elmer's glue. A glue gun could be used, but I found that the Elmer's glue was much easier to work with and there were no thin pieces of plastic "web" to contend with afterward.
Through my membership with the National Center for Catechesis of the Good Shepherd, I was able to download a control chart showing the necessary colors, and then began painting all of the pieces with craft paint. I also added the gloss in the various colors, though the finished look is still quite "matte". I painted only the tops and sides of the individual "prisms" so that there would be no confusion among the children as to which side goes up. Because there is a smaller end of each prism that must go toward the inside of the circle, I recommend placing a small dot on the side that goes inward using a sharpie to help the younger children know which way to place the pieces into the groves on the base.
 The three feasts of the church year were white, of course, and required an additional image be added. For Christmas, this was a star. For Easter, a cross. And for Pentecost, a flame. I sketched these lightly in pencil on the dry white paint before using black and gold paint pens. Be sure to get the ones with fine tips. And be sure to practice on other surfaces first. Sometimes the paint comes out all at once and can make a real mess of things.
  After painting all of the prisms, I painted the outside arcs white. Once this paint was dried, I used a black paint pen to add the lettering for these, and for the "rays" of each of the three major feast days.
 As a "take home" activity, I printed the control charts onto plain paper and cut them out, so that the students could color their own calendars to take home. The children seemed to enjoy this activity almost as much as they enjoyed placing the prisms into the wooden base.
No comments:
Post a Comment